Support our educational content for free when you buy through links on our site. Learn more
⚡️ Robot Fighting Electronics: The Ultimate 2025 Guide to Winning Circuits
If you’ve ever watched a robot fight and wondered what makes these mechanical gladiators tick — beyond the armor and weapons — you’re in the right place. At Robot Fighting™, we’ve spent countless hours tinkering, testing, and sometimes exploding electronics to uncover the secrets behind building reliable, battle-ready robot brains and power systems. From choosing the perfect battery pack to selecting the right ESCs and wiring everything up so it survives a 250G hit, this guide covers it all.
Did you know that over 60% of robot fight losses are due to electrical failures rather than mechanical damage? That’s why mastering your robot’s electronics is not just a nice-to-have skill — it’s the difference between walking away with a trophy or watching your bot sit dead in the arena. Stick around, because later we’ll reveal expert wiring tips and the top ESCs that give you the edge in 2025’s fiercest battles.
Key Takeaways
- Your robot’s electronics are its heart and brain — power systems, ESCs, and receivers must be carefully matched and robust.
- Safety is paramount: Proper battery handling, power switches, and insulation can prevent catastrophic failures.
- Choosing the right ESCs (brushed vs. brushless) and batteries (LiPo with correct C-rating) is critical for performance and reliability.
- Wiring quality and secure connectors like XT60 and JST can make or break your fight.
- Advanced ESC firmware like AM32 offers fine-tuned control for competitive advantage.
- Regular pre-fight checks and troubleshooting know-how keep your bot battle-ready.
Ready to electrify your robot and dominate the arena? Let’s get started!
Table of Contents
- ⚡️ Quick Tips and Facts
- 🤖 The Electrifying History of Combat Robot Circuitry: A Journey Through Time
- Why Your Robot’s Electronics Are Its Heart and Soul
- Safety First! Electrical Safety in Combat Robotics ⚠️
- Choosing the Right Components: A Decision-Making Guide for Robot Brains
- 1. Powering Up Your Bot: Batteries and Beyond
- The Juice Box: Selecting the Perfect Battery Pack
- The Lifeline: Essential Power Switches & Distribution Boards
- Connectors That Click: XT30, XT60, JST, and Bullet Plugs
- Wiring Wisdom: The Veins of Your Robot’s Electrical System
- Voltage Regulators (UBECs): Keeping Things Stable
- Power Supply Protectors: Your Robot’s Guardian Angels
- 2. The Brains of the Bot: Electronic Speed Controllers (ESCs) 🧠
- 3. Command & Control: Receivers, Servos, and Mixers 📡
- 4. Essential Accessories & Tools for Your Electronics Workbench 🛠️
- Wiring Wisdom: Best Practices for Robust Connections That Won’t Fail Mid-Fight
- Troubleshooting Common Electronic Gremlins: When Your Robot Acts Up 🐛
- Future Trends in Combat Robot Electronics: What’s Next? 🚀
- Building Your First Robot: A Beginner’s Electronics Checklist ✅
- Advanced Electronics for Competitive Edge: Pushing the Limits 🏆
- Conclusion: Powering Your Path to Robot Fighting Glory
- Recommended Links: Our Top Picks for Robot Fighting Gear
- Reference Links: Dive Deeper into Robot Electronics Knowledge
Here is the main body of the article, written according to your specifications.
⚡️ Quick Tips and Facts
Welcome to the electrifying world of Robot Fighting! We’re the crew at Robot Fighting™, and we’ve seen our fair share of sparks fly—both from clashing metal and from poorly wired electronics. Before we dive deep into the guts of your future champion, let’s get you primed with some essential, battle-tested wisdom. Think of this as your pre-fight checklist for the bot’s nervous system.
| Quick Tip 💡 | The Hard Truth 💥 – | Check, Check, and Re-Check! | As the excellent guide in the first YouTube video embedded in this article points out, you must double-check your electronics before an event, and again between every single fight. A loose JST connector can mean the difference between victory and a dead bot. – | Know Your ABCs (Amps, BECs, C-Ratings) | Amps are the current your motors draw. Your ESC must handle it. A BEC (Battery Eliminator Circuit) powers your receiver. Your battery’s C-Rating determines its max current output. Mismatch these, and you’re asking for a “brownout” (a sudden power drop). – | Insulate Everything! | Combat robots are tight spaces. Exposed wires or circuit boards are a guaranteed short circuit waiting to happen. Use heat shrink and electrical tape liberally. Hot glue on solder joints adds mechanical strength against brutal impacts. – | Brushless vs. Brushed | Brushed motors are simple, cheap, and great for beginner drive systems. Brushless motors are more powerful, efficient, and complex, making them ideal for devastating spinning weapons. They require different types of Electronic Speed Controllers (ESCs). – | LiPo Safety is NOT Optional | Lithium-Polymer (LiPo) batteries pack a massive punch but can be dangerous if mistreated. Never puncture them, always use a proper LiPo charger, and store them in a fire-safe bag. A battery fire can end your event (and your robot) instantly. –
🤖 The Electrifying History of Combat Robot Circuitry: A Journey Through Time

Ever wonder how we got from clunky, radio-controlled cars with kitchen whisks taped to them to the lightning-fast, titanium-shredding monsters you see in the arena today? The secret, my friends, is in the evolution of the electronics.
In the early days of robot combat, builders were scavengers. We ripped the guts out of RC cars, hacked old cordless drill motors, and used massive, heavy lead-acid batteries. The speed controllers were often simple, inefficient, and prone to literally catching fire under pressure. It was a wild, unpredictable time that forged the foundations of modern Robot Design and Engineering.
Then came the game-changers. The widespread adoption of Lithium-Polymer (LiPo) batteries, originally developed for the mobile phone industry, gave us an incredible power-to-weight ratio. Suddenly, our bots could be faster and more powerful without packing on the pounds. Around the same time, brushless motors and the sophisticated Electronic Speed Controllers (ESCs) needed to run them trickled down from the RC airplane and drone markets. This was the dawn of the truly destructive spinning weapon, changing the sport forever.
Today, we live in a golden age of combat robotics electronics. Companies now design components specifically for the brutal conditions of the arena. We have tiny, dual-channel ESCs that can handle massive current spikes, integrated power distribution boards, and receivers the size of a postage stamp. It’s a testament to the relentless innovation of builders and engineers in this amazing sport.
Why Your Robot’s Electronics Are Its Heart and Soul
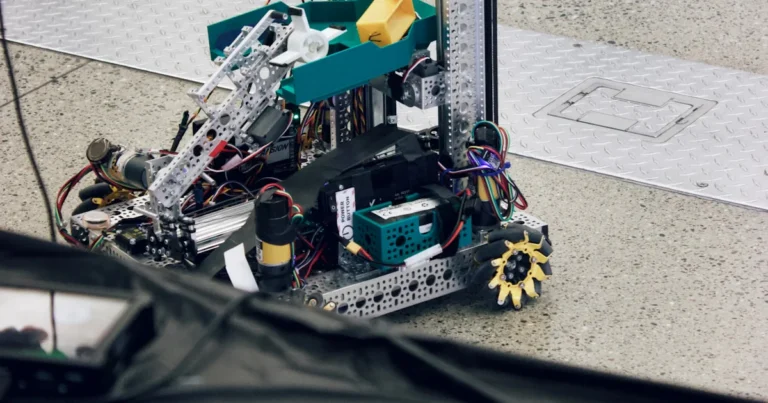
Let’s get one thing straight: a 10-pound block of solid titanium with a perfectly forged S7 tool steel weapon is just a very expensive paperweight without a good electronics system.
Think of your robot’s electronics as its central nervous system and its cardiovascular system combined.
- The Battery: This is the heart, pumping life-giving current throughout the body.
- The Wires: These are the veins and arteries, carrying that power to every component.
- The Power Switch & PDB: This is the aortic valve, controlling the flow and ensuring power goes where it’s needed.
- The Receiver: This is the brain’s audio processing center, listening for commands from you via the transmitter.
- The ESCs: These are the synapses and motor neurons, translating the receiver’s signals into precise instructions for the motors.
When this system works in harmony, your robot is a seamless extension of your will. When it fails? You become a spectator, watching helplessly as your creation sits dead in the middle of the box. A weak connection, an undersized ESC, or a dying battery can snatch defeat from the jaws of victory.
So, how do you build a system that can withstand a 250G impact and keep on ticking? That’s what we’re here to show you.
Safety First! Electrical Safety in Combat Robotics ⚠️
This isn’t the section to skim. The power systems in these robots are not toys. A short circuit in a high-discharge LiPo battery can lead to a violent, toxic fire in seconds. At Robot Fighting™, safety is paramount, and it starts with respecting the electricity. All competitions have strict Robot Combat Rules and Regulations regarding electrical safety.
LiPo Battery Safety: The Golden Rules
✅ Always use a dedicated LiPo balance charger. Never use a NiMH or NiCd charger. ✅ Charge batteries in a fire-resistant container, like a LiPo bag or a metal box, away from flammable materials. ✅ Never leave charging batteries unattended. Seriously. Don’t do it. ✅ Inspect your batteries before and after every match. If you see any puffing, swelling, or damage to the casing, safely discharge and dispose of the battery according to local regulations. Do NOT use it. ✅ Never puncture a LiPo battery. The resulting chemical reaction with the air is… explosive. ❌ Don’t over-discharge your batteries. Most ESCs have a low-voltage cutoff, but it’s good practice to check your battery voltage between fights. ❌ Don’t store batteries fully charged for long periods. Store them at a “storage charge” of about 3.8V per cell, which your charger will have a setting for.
In-Robot Safety
- Insulate, Insulate, Insulate: Cover every single exposed solder joint and connection with heat shrink tubing. Where wires might rub against a carbon fiber or metal frame, add extra protection.
- Secure Your Wires: Don’t let wires flop around inside your bot. A loose wire can get caught in a spinning weapon or pulled out during a big hit. Use zip ties or hot glue to secure them.
- The Failsafe: Your transmitter/receiver system has a “failsafe” setting. This determines what your robot does if it loses signal. ALWAYS set your failsafe to shut off all motors. You don’t want your spinner going full tilt in the pits because you accidentally turned off your transmitter.
Choosing the Right Components: A Decision-Making Guide for Robot Brains
Walking into the world of robot electronics can feel like drinking from a firehose. Malenki, Scorpion, Repeat, AM32, XT60… what does it all mean?! Relax. We’ve got you. Choosing the right parts is a balancing act between four key factors:
- Power: How much voltage and current do your motors need to be effective?
- Weight: Every gram counts, especially in the smaller weight classes.
- Complexity: Are you ready to fine-tune dozens of settings, or do you want something that’s plug-and-play?
- Durability: Can it survive the apocalypse happening inside that arena?
We’re going to break down the core components into three main systems: Power, Brains (ESCs), and Command & Control. By the end of this, you’ll be able to confidently select the parts for your build, and our Robot Building Guides can help you put it all together.
1. Powering Up Your Bot: Batteries and Beyond
This is your robot’s powerhouse. A weak power system means a weak robot, no matter how brilliant the design.
The Juice Box: Selecting the Perfect Battery Pack
For virtually all modern combat robots, the Lithium-Polymer (LiPo) battery is king. When you’re shopping for one, you’ll see three key numbers:
- Voltage (S-Rating): This is the “power” of the battery. It’s denoted by a number followed by “S” (meaning “series”). Each cell is nominally 3.7V.
- 2S (7.4V): Great for servo-based lifters and beginner drive systems.
- 3S (11.1V): A sweet spot for many antweight (1lb) spinners.
- 4S (14.8V) and higher: Common in larger weight classes for truly terrifying weapon power.
- Capacity (mAh): This is the “gas tank.” Milliamp-hours (mAh) tell you how long the battery will last. For a 3-minute match, a 300-450mAh battery is often plenty for a 1lb bot.
- Discharge Rate (C-Rating): This is crucial! It tells you the maximum current the battery can safely provide. It’s given as a number (e.g., “75C”). To find the max amps, you multiply the C-rating by the capacity (in amps).
- Example: A 300mAh (0.3Ah) 75C battery can provide 0.3 * 75 = 22.5 amps. If your motors try to pull more than that, the voltage will sag (a “brownout”), and you could lose control or even damage the battery.
| Battery Spec | What it Means for Your Bot – | Higher Voltage (S) | More speed (RPM) for weapons and drive. More “punch.” – | Higher Capacity (mAh) | Longer run time. Can handle higher current draws for longer. But adds weight. – | Higher Discharge (C) | Can deliver more current instantly without voltage sag. Essential for powerful spinners. A low C-rating is a common cause of failure for weapon systems. –
The Lifeline: Essential Power Switches & Distribution Boards
Your power switch is the most important safety feature on your robot. It allows you to quickly and reliably kill all power to the bot. Do not cheap out on your switch! A flimsy switch can fail “on,” creating a dangerous situation, or get knocked loose during a hit, costing you the match.
Mini Power Switches: Small but Mighty
For smaller bots, a dedicated combat-ready switch is a must.
FingerTech Mini Power Switch
| Rating | Score (1-10) |
|---|---|
| Design | 9 |
| Durability | 10 |
| Ease of Use | 8 |
| Overall | 9 |
The FingerTech Mini Power Switch is an icon in the sport for a reason. It’s designed specifically to prevent accidental shut-offs. You need a tool (like a hex key or the weapon lock-screw) to actuate it, meaning a random hit from an opponent won’t turn your bot off. It’s a simple, robust, and battle-proven solution.
Robust Power Distribution Boards (PDBs): The Central Hub
A PDB is like a smart power strip for your robot. It takes the main power from your battery and provides multiple, clean connection points for your ESCs and other components. Boards like the Just Cuz Basic PD Board are fantastic for simplifying your wiring, reducing the number of messy solder joints, and making your electronics bay much cleaner and more reliable.
Specialized Switches: Lynx, Just ‘Cuz Robotics PCB, and More
Other great options include the Lynx Switch and the Just ‘Cuz Robotics PCB Switch v1.1. These often offer different form factors or mounting options, giving you flexibility in your design. Some, like the Just Cuz Switch Power Distribution Board, even combine the switch and PDB into a single, convenient unit.
Connectors That Click: XT30, XT60, JST, and Bullet Plugs
Consistent and reliable connectors are non-negotiable. A loose connection is a dead robot. As the video guide at #featured-video mentions, ensuring all your connectors are compatible and secure is a pre-fight essential.
| Connector Type – | Common Use – | | XT60 – | Main Power. High current (around 60A). The go-to for battery connections in beetleweights (3lb) and larger bots. – | | XT30 – | Main Power/Motors. Lower current (around 30A). Perfect for antweight (1lb) and plastic antweight battery connections and high-power motors. – | | JST-RCY – | Motors/Low Power. Low current (around 3-5A). Very common for smaller brushed drive motors like N20s. Do not use for your main battery connection. – | | Bullet Connectors – | Brushless Motors. Used for the three wires connecting a brushless motor to its ESC. Sizing (e.g., 3.5mm) depends on the current. – |
Wiring Wisdom: The Veins of Your Robot’s Electrical System
Use high-quality, flexible silicone wire. The “AWG” number indicates the gauge or thickness; a lower number is thicker wire and can handle more current. For a 1lb-3lb bot, 14-18AWG is common for main power, while 22-26AWG is fine for motors.
Voltage Regulators (UBECs): Keeping Things Stable
Your radio receiver and servos typically need 5V to operate. Your 3S (11.1V) battery will fry them. That’s where a Battery Eliminator Circuit (BEC) comes in. Most drive ESCs have a built-in 5V BEC to power your receiver. However, if you’re running powerful servos, the ESC’s BEC might not provide enough current, causing a “brownout.” In this case, a separate, more powerful Universal BEC (UBEC) like the V 4A Switching UBEC Regulator is the solution. It wires directly to the battery and provides a stable, high-current 5V source for your components.
Power Supply Protectors: Your Robot’s Guardian Angels
Components like the Small Power Supply Protector are simple, lightweight circuits that can help absorb voltage spikes that might occur when a weapon motor stops suddenly. They are a cheap and lightweight insurance policy for your more expensive electronics.
2. The Brains of the Bot: Electronic Speed Controllers (ESCs) 🧠
If the battery is the heart, the ESC is the brain. It takes the signal from your receiver and tells the motor how fast to spin and in which direction. This is where a huge amount of your robot’s performance comes from.
Brushed ESCs: The Workhorses for Simpler Drives
For the simple, two-wire brushed motors common in drive systems, you need a brushed ESC. They are typically sold in dual-channel configurations to control both sides of your drive with one board.
Repeat Robotics Plug-and-Play Dual Brushed ESC (DESC)
| Rating | Score (1-10) |
|---|---|
| Design | 9 |
| Functionality | 10 |
| Ease of Use | 10 |
| Overall | 9.5 |
The Repeat Robotics Budget Ant DESC is a dream for new builders. It’s affordable, reliable, and its key feature is onboard channel mixing. This means you can plug it in, and it will automatically configure itself for single-stick “tank” steering without any complex transmitter setup. It’s a fantastic choice for getting a bot moving with minimal fuss. Another excellent option is the Just Cuz Robotics WEKA Dual Brushed 20A ESC, which offers similar functionality and a robust design.
Brushless ESCs: High Performance for Weapons and Drives
For three-wire brushless motors, you need a brushless ESC. These are more complex but unlock a much higher level of performance. The single most important spec is the current rating (Amps). As a rule of thumb, and as noted in the #featured-video guide, choose an ESC rated for at least 20-30% higher than your motor’s maximum stated current draw. A motor in a combat robot under load will pull way more current than it does on a drone in open air.
Single Brushless ESCs: Aria, Scorpion, Wasp, and Tiny ESCs
These are single-channel ESCs, perfect for running one weapon motor.
- Aria BLHeli Brushless ESCs: Available in various amp ratings (like 35A or 70A), these are known for their reliability and use of the popular BLHeli firmware.
- Scorpion Mini ESC: A lightweight and compact option, great for when every gram counts.
- Wasp ESC: Another popular and reliable choice in the community.
- Tiny ESC: The name says it all! Versions like the Tiny ESC v3 are incredibly small, perfect for cramming into tight builds.
Pro Tip: If your brushless motor spins the wrong way, don’t rewire your whole bot! Just swap any two of the three motor wires connected to the ESC.
Dual Brushless ESCs: Malenki Nano, Repeat Robotics, and Scorpion Duals
For a high-performance brushless drive system, a dual ESC is the cleanest solution.
- Malenki Nano Dual ESC: A tiny, powerful dual ESC that has become a staple for high-performance antweights.
- Repeat Robotics Dual ESC: A robust and well-regarded option for builders wanting a reliable brushless drive.
- Scorpion Nano Dual ESC: Another excellent, compact choice for builders who want top-tier performance in a small package.
AM32 ESCs: The Next Generation of Control
ESCs running AM32 firmware, like the Repeat Robotics AM32 ESC or the Just Cuz Robotics 35A AM32 ESC, represent the cutting edge. This open-source firmware gives builders an incredible amount of control to fine-tune motor performance, including startup power, braking, and more, giving you a competitive edge.
Specialized Weapon ESCs: Beater Bar Electronics and More
Some kits, like the lb Beater Bar Electronics kits, come with ESCs specifically chosen and sometimes pre-programmed for the included weapon motor, taking the guesswork out of the equation.
ESC Programming: Fine-Tuning Your Robot’s Moves
Many modern ESCs (especially those with BLHeli or AM32 firmware) are programmable. Using a tool like the Grey Skies Automation ESC Programmer, you can connect the ESC to your computer and change settings like motor direction, braking strength, and startup power. This is an advanced topic but can be key to getting the maximum performance out of your weapon.
3. Command & Control: Receivers, Servos, and Mixers 📡
This system is how you, the driver, actually talk to your robot.
The Listener: Choosing Your Robot’s Receiver
The receiver takes the radio signal from your transmitter and turns it into PWM signals that the ESCs can understand. The main concerns here are size, weight, and reliability. The receiver that comes with many transmitters is often bulky. That’s why the community loves tiny receivers like the FlySky FS2A 4CH AFHDS-2A Mini Compatible Receiver. As highlighted in the #featured-video guide, swapping to a smaller receiver is one of the easiest ways to save critical space and weight in a small bot.
The Movers: Servos for Actuation and Steering
Servos are self-contained motor and gearbox units used for lifters, grabbers, and clamps. They offer precise position control. For combat, you need high-torque metal gear servos that can take a beating. A product like the Just Cuz Robotics 32kg Combat Robot Servo is designed specifically for this, offering immense power in a standard-size package.
The Coordinator: Tiny Mixers for Simplified Control
If your dual-channel ESC doesn’t have built-in mixing (like the Repeat DESC does), and you want to drive your bot “tank style” with one joystick, you’ll need a Tiny Mixer. This small board sits between your receiver and your two ESCs, interpreting the single joystick’s forward/back and left/right inputs to control the two motors independently.
4. Essential Accessories & Tools for Your Electronics Workbench 🛠️
The devil is in the details, and these small components can make or break your build.
- LED Indicators: A simple Robot Power LED is invaluable. It gives you a clear visual confirmation that your bot is on and can help diagnose power issues at a glance.
- Terminal Blocks: For certain connections, Mini Terminal Blocks can provide a secure, screw-down connection point that is more robust than a simple solder joint.
- Heat Shrink Tubing: Don’t even think about building without it. Heat Shrink Tubing is the professional way to insulate every single electrical connection. Use it everywhere.
- JST to 9V Battery Adapters: These are super useful for testing individual components on your workbench without having to plug in your main LiPo battery.
- Mounting Kits: A loose power switch is a liability. A Mini Power Switch Mounting Kit ensures your switch stays exactly where you put it, no matter how hard the hits get.
Wiring Wisdom: Best Practices for Robust Connections That Won’t Fail Mid-Fight
We’ve seen more fights lost in the pits to bad wiring than in the arena to big hits. A robot that doesn’t work is a robot that can’t win. Here’s our team’s mantra for bulletproof wiring, perfect for any DIY Robot Building project.
- Plan Your Layout: Before you solder a single wire, lay out your components. Visualize where the wires will run. Keep power wires away from receiver signal wires if possible to reduce interference. Aim for the shortest possible wire runs to save weight and reduce voltage drop.
- Tin Your Wires and Pads: Before soldering a wire to a board, apply a small amount of solder to both the stripped wire end (“tinning”) and the pad on the board. This makes creating a strong, instant joint much easier.
- The “Volcano” Solder Joint: A good solder joint should be shiny, not dull, and shaped like a little volcano, flowing smoothly from the pad up onto the wire.
- Mechanical Strain Relief: This is the secret sauce. Solder joints are brittle. The intense vibration and impacts of combat will break them. After soldering, add a dab of hot glue or neutral-cure silicone at the base of the joint where the wire meets the board. This absorbs the vibration, protecting the solder itself. This tip, also mentioned in the #featured-video guide, is absolutely critical.
- Tug Test: After a joint has cooled, give it a firm but gentle tug. If it moves at all, reflow it. It’s better to find a weak joint on the bench than in the middle of a fight.
Troubleshooting Common Electronic Gremlins: When Your Robot Acts Up 🐛
Your bot is fully assembled, but it’s acting possessed. Or worse, not acting at all. Don’t panic! 99% of electronics problems are simple. Here’s a quick guide to squashing those gremlins.
| The Gremlin 🐛 – | The Fix 🕵️ ♂️ – | | “It’s completely dead.” – | 1. Is the battery plugged in? (Yes, we have to ask!) 2. Is the power switch on? 3. Is the battery charged? Check it with a voltage checker. 4. Look for a short circuit. Are any wires frayed or touching the frame? – | | “One side of my drive doesn’t work.” – | 1. Check the motor connection. Is the JST or bullet connector fully seated? 2. Swap the motor outputs on the ESC. If the problem moves to the other wheel, the ESC is likely the issue. If it stays with the same wheel, the motor or its wiring is the problem. … | | “My robot twitches or loses control when I spin up the weapon.” – | This is a classic “brownout.” Your weapon motor is drawing so much current that the battery voltage drops, starving your receiver for power. 1. Get a better battery. You need one with a higher C-rating. 2. Add a separate UBEC. Powering the receiver independently from the ESCs can solve this. 3. Check your wiring. Thin wires can cause voltage drop under load. – |
Future Trends in Combat Robot Electronics: What’s Next? 🚀
The world of robot electronics moves at lightning speed. So what’s on the horizon?
- Greater Integration: We’re seeing a move towards “all-in-one” boards. Imagine a single PCB that contains your power switch, PDB, dual drive ESC, and weapon ESC. This reduces wiring, saves space and weight, and improves reliability. The Just ‘Cuz Robotics Motherboard is an early example of this philosophy.
- Smarter ESCs: Firmware like AM32 is just the beginning. Future ESCs will likely have more advanced telemetry, feeding real-time data like current draw, temperature, and RPM back to the driver. This could allow for on-the-fly power adjustments and better diagnostics.
- Gallium Nitride (GaN) Technology: This is a bit out there, but GaN transistors are more efficient and smaller than the silicon-based ones currently used in ESCs. As this tech becomes cheaper, it could lead to even smaller, more powerful, and more efficient speed controllers. The future is tiny and terrifying!
Building Your First Robot: A Beginner’s Electronics Checklist ✅
Feeling ready to build? Here is a sample “shopping list” for a competitive 1lb antweight robot. This is a proven combination that’s perfect for getting started.
- ✅ Transmitter/Receiver: Flysky FS-i6S with an upgraded FlySky FS2A 4CH Mini Receiver.
- ✅ Battery: 3S (11.1V) 300-450mAh LiPo with an XT30 connector.
- ✅ Power Switch: FingerTech Mini Power Switch.
- ✅ Drive ESC: Repeat Robotics Budget Ant DESC (for its simplicity and built-in mixing).
- ✅ Drive Motors: A pair of 22mm or 25mm brushed planetary gearmotors.
- ✅ Weapon ESC: A single brushless ESC rated for your weapon motor (e.g., a 20A-30A BLHeli ESC).
- ✅ Weapon Motor: A 2205 or similar sized brushless outrunner motor.
- ✅ Connectors: XT30 for the battery, JSTs for the drive motors, 3.5mm bullets for the weapon motor.
- ✅ Miscellaneous: Silicone wire (18AWG and 24AWG), heat shrink tubing, zip ties.
Advanced Electronics for Competitive Edge: Pushing the Limits 🏆
Once you’ve mastered the basics, the electronics world offers endless ways to gain an advantage.
- Custom PCBs: Designing your own printed circuit boards (PCBs) allows you to create a perfectly integrated electronics package tailored to your specific robot design. This is the ultimate in clean wiring and space-saving.
- Telemetry: High-end radio systems can receive data back from the robot. With the right sensors, you could have a real-time voltage display on your transmitter, letting you know exactly how much juice you have left in a tough match.
- High-Voltage Systems: While most small bots run on 2S-4S, some builders experiment with 6S (22.2V) or even higher voltages. This can provide insane weapon power but requires very careful component selection and carries a higher risk. It’s the deep end of the pool, but the rewards can be spectacular. You can see some of these advanced builds in our Robot Combat Videos section.
Conclusion: Powering Your Path to Robot Fighting Glory

Phew! That was quite the deep dive into the electrifying world of combat robot electronics. From the humble beginnings of scavenged RC parts to today’s cutting-edge brushless ESCs and integrated power distribution boards, your robot’s electronics truly are its heart, brain, and nervous system all rolled into one.
We’ve explored the essentials: batteries that pack a punch, power switches that keep you safe, ESCs that translate your commands into devastating weapon spins or nimble drives, and receivers and servos that keep you in control. We also shared our best wiring tips and troubleshooting hacks that can save your bot from the dreaded “dead in the box” fate.
If you’re building your first bot, the Repeat Robotics Budget Ant DESC and FingerTech Mini Power Switch combo is a fantastic place to start — reliable, user-friendly, and battle-tested. For those ready to push the envelope, AM32 ESCs and custom PCBs open doors to fine-tuned performance and integration that can give you the competitive edge.
Remember the golden rule: no matter how shiny your weapon or how tough your armor, your robot’s electronics must be rock-solid, safe, and perfectly matched to your design goals. Skimping here is a guaranteed way to lose a fight — and maybe even your bot.
So, are you ready to wire up your champion and light up the arena? With the knowledge and gear we’ve covered, you’re well on your way to making sparks fly — in the best way possible.
Recommended Links: Our Top Picks for Robot Fighting Gear
Ready to gear up? Here are some of the best products and resources we trust and recommend for your robot fighting electronics journey:
- FingerTech Mini Power Switch – The battle-proven power switch that won’t quit.
- Repeat Robotics Budget Ant DESC – The perfect dual brushed ESC for beginners and pros alike.
- Just Cuz Robotics AM32 ESCs – Advanced ESCs with open-source firmware for fine-tuned control.
- FlySky FS2A 4CH Mini Receiver – Tiny, reliable receiver for tight builds.
- V 4A Switching UBEC Regulator – Stable power supply for your receiver and servos.
- Heat Shrink Tubing Kit – Essential for insulating and protecting your wiring.
- XT60 Connectors – The go-to connectors for main power.
- “Robot Builder’s Bonanza” by Gordon McComb – A classic book packed with practical advice for robot builders.
Frequently Asked Questions (FAQ)
 by Robot Fighting")
What are the essential electronics components for building a robot fighting machine?
The core components include:
- Battery: Usually a LiPo pack chosen for voltage, capacity, and discharge rate.
- Power Switch: A robust switch like the FingerTech Mini Power Switch to safely control power.
- Electronic Speed Controllers (ESCs): Brushed or brushless ESCs to control motors.
- Motors: Brushed for drive systems or brushless for weapons.
- Receiver and Transmitter: To wirelessly control your robot.
- Servos: For actuators like lifters or clamps.
- Connectors and Wiring: XT60, XT30, JST connectors, and silicone wire for reliable power and signal transmission.
- Voltage Regulators (UBECs): To supply stable 5V power to receivers and servos.
Each component must be carefully matched to your robot’s size, power needs, and design constraints.
Read more about “Does the Winner of BattleBots Get Money? 💰 The Truth Revealed (2025)”
How do motor controllers improve robot fighting performance?
Motor controllers (ESCs) translate your commands into precise motor actions. They:
- Provide smooth acceleration and braking, preventing mechanical stress.
- Allow direction control (forward/reverse).
- Enable fine-tuning of motor startup power, braking strength, and current limits.
- Support dual ESC setups for tank-style steering.
- Handle high current loads safely, preventing damage to motors and batteries.
Advanced ESCs with programmable firmware (like AM32 or BLHeli) let you optimize performance for your specific motor and weapon setup, giving you a competitive edge.
Read more about “Robot Fighting Controllers: Master Your Bot’s Command in 2025 ⚔️”
What types of sensors are best for robot fighting electronics?
While many combat robots rely on driver skill and simple electronics, some advanced bots incorporate sensors such as:
- Current sensors: To monitor motor load and detect stalls.
- Temperature sensors: To prevent ESC or motor overheating.
- Gyroscopes and accelerometers: For stability control or self-righting mechanisms.
- Proximity sensors: To automate weapon activation or defensive maneuvers.
However, sensors add complexity and weight, so they’re mostly used in higher-level competition robots.
How can I design a durable power system for a robot fighting competition?
Durability comes from:
- Choosing batteries with appropriate C-ratings to handle peak current without voltage sag.
- Using high-quality connectors (XT60/XT30) and secure solder joints with heat shrink insulation.
- Incorporating power distribution boards to reduce wiring complexity.
- Installing robust power switches designed for combat conditions.
- Adding power supply protectors to absorb voltage spikes.
- Securing and insulating all wiring to prevent shorts and mechanical damage.
- Regularly inspecting and testing your system before and after fights.
Read more about “What Is Banned in BattleBots? 15 Rules You Must Know (2025) 🤖🚫”
What microcontrollers are most popular in robot fighting electronics?
Most combat robots rely on off-the-shelf ESCs and receivers that handle the low-level motor control and radio communication. However, builders who want custom control often use:
- Arduino boards: For custom sensor integration and control logic.
- Teensy microcontrollers: For more processing power and advanced features.
- Raspberry Pi: Occasionally used for vision processing or advanced autonomy.
The choice depends on your robot’s complexity and your programming skills.
How do you troubleshoot common electronic issues in robot fighting robots?
Start with the basics:
- Check power connections: Battery plugged in? Switch on? Charged battery?
- Inspect wiring: Look for loose connectors, broken wires, or shorts.
- Test ESCs and motors individually: Swap motor wires or ESC channels to isolate faults.
- Use a multimeter: Verify voltages at key points.
- Check receiver and transmitter binding: Ensure communication is solid.
- Look for brownouts: If the robot twitches or loses control under load, consider battery or wiring upgrades.
Systematic testing and patience are key.
Read more about “⚡️ Top 10 Robot Fighting Batteries to Dominate the Arena (2025)”
What safety features should be included in robot fighting electronics systems?
Safety is non-negotiable:
- Reliable power switches that prevent accidental shutoff.
- Failsafe settings on receivers to cut power if signal is lost.
- Proper insulation with heat shrink tubing and secure solder joints.
- Battery safety: Use LiPo balance chargers, fireproof charging bags, and inspect batteries regularly.
- Mechanical strain relief on wires to prevent breaks.
- Power supply protectors to absorb voltage spikes.
- Emergency kill switches accessible to event officials.
Following these guidelines protects you, your robot, and everyone around.
Reference Links: Dive Deeper into Robot Electronics Knowledge
- FingerTech Robotics Official Site
- Repeat Robotics Official Site
- Just Cuz Robotics ESCs and Boards
- FlySky RC Transmitters and Receivers
- BLHeli Firmware Information
- AM32 ESC Firmware and Resources
- RoboJackets Wiki: Electronics Basics
- Robot Fighting™ Combat Rules and Regulations
- Robot Fighting™ Robot Design and Engineering
- Robot Fighting™ DIY Robot Building
With these resources and your newfound knowledge, you’re ready to electrify the arena and build a robot that not only fights but wins. Good luck, and may your circuits stay cool and your weapons spin fast! ⚡🤖🔥